A. OBJECTIVE
to master the way of working with JDBC and JDBC implementation with DAO concept model.
B. OVERVIEW
In this subject will be learnt how the application created can work with
DBMS (Database Management System) using JDBC (Java Database
Connectivity) concept. The implementation of using JDBC in application
will use DAO (Data Access Object) model working system which separates
the data access function from the other part of application
(presentation and control function).
C. INSTRUMENTS AND MATERIALS
1. Computer/laptop
2. Module Object Oriented Programming
3. Software
a. Netbeans IDE 8.0.2
b. Java Development Kit (JDK)
D. WORK STEPS
1. Create new project.
2. Create some new packages inside the project.
a. Login
b. FormUtama
c. Petugas
d. Buku
e. Peminjaman
f. Pengembalian
g. Laporan
3. Add 2 classes in Login packages.
a. ViewLogin class >> a JFrame (used for creating interface)
b. DAOLogin class >> a DAO for login function (used for accessing DBMS)
4. Before working further with DAO (inside the java appliaction), prepare the database which will be used by the application.
5. Run phpmyadmin (from XAMPP) to create the needed database. Name it with perpustakaan_NIM (ex: perpustakaan_005).
6. In the database, add a table named user with 3 columns.
7. Add 4 data in the user table.
8. Back to java application, on ViewLogin, add object as follows.
Change the properties.
The view will be as follows.
9. On ViewLogin, move to source code view mode.
10. Declare an object in DAOLogin.
public class ViewLogin extends javax.swing.JFrame {
private DAOLogin daoLogin;
/**
* Creates new form ViewLogin
*/
public ViewLogin() {
daoLogin = new DAOLogin();
initComponents();
}
11. Now we will finish the programming in DAOLogin part.
12. First step, work with JDBC are (1) determining the JDBC Driver to be
used. there are 2 stages: (a) add JDBC Driver file used (b) enlist the
Driver to DriverManager
Add the following code.
public DAOLogin(){
try{
Class.forName("org.gjt.mm.mysql.Driver");
} catch (ClassNotFoundException ex){
System.out.println("DRIVER Error");
}
}
13. Second step, determine the connection address (URL, user, password)
public class DAOLogin {
private String url = "jdbc:mysql://localhost:3306/perpustakaan_005";
private String username = "root";
private String password = "";
14. Third and forth steps, create the method to connect to the server and create object statement.
private Connection koneksi;
private Statement sttmt;
public void bukaKoneksi(){
try{
koneksi = DriverManager.getConnection(url, username, password);
sttmt = (Statement) koneksi.createStatement();
} catch (SQLException ex){
System.out.println("KONEKSI Error");
}
}
15. Fifth step, create the method to check the login.
public int login(String namaPengguna, String passwordPengguna){
ResultSet rsLogin;
int status = 0;
try{
rsLogin = sttmt.executeQuery("select count(*) from pengguna where "
+"namaPengguna='"+namaPengguna+"' "
+"and password='"+passwordPengguna+"'");
rsLogin.first();
status = rsLogin.getInt(1);
} catch (SQLException ex){
System.out.println("Query Error");
}
return status;
}
16. Add program code in ViewLogin class in constructor part to open the connection.
public class ViewLogin extends javax.swing.JFrame {
private DAOLogin daoLogin;
/**
* Creates new form ViewLogin
*/
public ViewLogin() {
daoLogin = new DAOLogin();
daoLogin.bukaKoneksi();
initComponents();
}
17. Add event listener in btnLogin to check login.
18. Add the source code.
private void btnLoginActionPerformed(java.awt.event.ActionEvent evt) {
// TODO add your handling code here:
int status = daoLogin(txtNamaPengguna.getText(),txtPassword.getText());
if(status == 0){
JOptionPane.showMessageDialog(null, "LOGIN GAGAL");
} else if (status > 0){
JOptionPane.showMessageDialog(null, "LOGIN SUKSES");
}
}
19. Run the program.
20. Add program code in btnKeluar.
private void btnKeluarActionPerformed(java.awt.event.ActionEvent evt) {
// TODO add your handling code here:
System.exit(0);
}
Here is the full source code in DAOLogin:
package Login;
import java.sql.Connection;
import java.sql.DriverManager;
import java.sql.ResultSet;
import java.sql.SQLException;
import java.sql.Statement;
/**
*
* @author Dessy
*/
public class DAOLogin {
//2. menemtukan alamat/parameter koneksi
private String url = "jdbc:mysql://localhost:3306/perpustakaan_005";
private String username = "root";
private String password = "";
//3. buat object koneksi
private Connection koneksi;
//4. buat object statement
private Statement sttmt;
public DAOLogin(){
//1. memanggil driver jdbc
try{
Class.forName("org.gjt.mm.mysql.Driver");
} catch (ClassNotFoundException ex){
System.out.println("DRIVER Error");
}
}
//3 & 4. buat metode koneksi dan object statement
public void bukaKoneksi(){
try{
koneksi = DriverManager.getConnection(url, username, password);
sttmt = (Statement) koneksi.createStatement();
} catch (SQLException ex){
System.out.println("KONEKSI Error");
}
}
/**5. buat metode untuk login
* pseudocode
* cari dalam tabel pengguna, pengguna yang sesuai dengan nama pengguna dan password pengguna
* jika ada data yang sesuai
* resultset maka rsLogin akan berubah nilai menjadi lebih dari 0
*/
public int login(String namaPengguna, String passwordPengguna){
ResultSet rsLogin;
int status = 0;
try{
rsLogin = sttmt.executeQuery("select count(*) from pengguna where "
+"namaPengguna='"+namaPengguna+"' "
+"and password='"+passwordPengguna+"'");
rsLogin.first();
status = rsLogin.getInt(1);
} catch (SQLException ex){
System.out.println("Query Error");
}
return status;
}
}
Senin, 22 Juni 2015
Senin, 08 Juni 2015
Modul 8 Praktikum Object Oriented Programming
MODUL 8
JAVA SWING
A. Objective
To understand how was java swing run.
B. Basic Theory
Swing
is an other alternative to implement window program. Although implemented based
on AWT class, swing not use components in AWT, so the components display in the
swing not depend on system window local. So the graphic display from swing to
all of operation system become similar.
C. Tools and
Materials
·
Laptop
·
NetBeans Software
·
Java Development Kit (JDK)
D. Steps
1. Open netbeans
2. Right click
project and make new jFrame Form
3. Next, add jPanel
component in form that has made
4. Add the menus
component and change the name become “Ubah Warna”
5. Next, give an
item component menu in menu, so after menu clicked then shown dropdown menu

6. In the
inspector panel, choose one of item menu that will given an action, so when the
menu clicked, the window background color will change.
Right click on item menu - choose even –
actionPerformed
7. Add code below
under the actionPerformed
jPanel1.setBackground(Color.red);
jLabel1.setText(“Warna Background
Merah”);
the code:
private void
jMenuItem1ActionPerformed(java.awt.event.ActionEvent evt) {
jPanel1.setBackground(Color.red);
jLabel1.setText("Warna Background Merah");
}
private void
jMenuItem2ActionPerformed(java.awt.event.ActionEvent evt) {
jPanel1.setBackground(Color.green);
jLabel1.setText("Warna Background Hijau");
}
private void
jMenuItem3ActionPerformed(java.awt.event.ActionEvent evt) {
jPanel1.setBackground(Color.yellow);
jLabel1.setText("Warna Background Kuning");
}
private void
jMenuItem4ActionPerformed(java.awt.event.ActionEvent evt) {
jPanel1.setBackground(Color.MAGENTA);
jLabel1.setText("Warna Background Magenta");
}
8. That following
code will change background color become red and in the middle of window will
shown “Warna Background Merah”

Exercises
1.
Add another color, green and yellow.

2.
Add the icon next to the item menu
Modul 7 Praktikum Object Oriented Programming
MODUL 7
APPLET
A. Objective
To understand how was java applet run.
B. Basic Theory
Applet
is a java program which has a purpose to web browser environment. Applet is a
subclasses of Panel which located in java.applet package, it make things which
can located in panel also can located in applet.
As
a program for web browser, applet completed with fitur to comunicate with host
server and between applet. But, applet designed not for do an operation to
client computer because a security reason.
C. Tools and
Materials
·
Laptop
·
NetBeans Software
·
Java Development Kit (JDK)
D. Steps
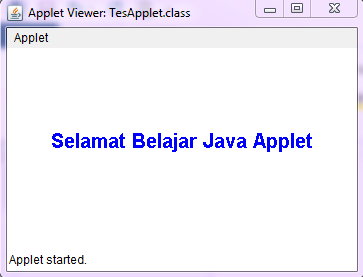
1. Make a new class
applet file named “TesApplet.java” , write down program code as below
/**
*
* @author DESY
*/
public class TesApplet extends
Applet {
public void paint (Graphics grafik){
Font font = new Font("sanserif", Font.BOLD, 20);
grafik.setFont(font);
grafik.setColor(Color.blue);
int xPusat = this.getSize().width/2;
int yPusat = this.getSize().height/2;
String ucapan = "Selamat
Belajar Java Applet";
FontMetrics fontMetrics = this.getFontMetrics(font);
int posisiX =
xPusat-(fontMetrics.stringWidth(ucapan)/2);
grafik.drawString(ucapan, posisiX, yPusat);
}
}
2. Compile and
run the following program code
3. After the
program compiled will shown a file named “TesApplet.class”. this file will
called in every HTML script.
4. Next, make a
HTML file as code below, save as “TesApplet.html”
<html>
<head>
<title> Selamat Belajar Java Applet</title>
</head>
<body>
<h1>Tes Applet</h1>
<applet code
= “TesApplet.class” width = 250 height = 8>
</applet>
<br>
</body>
</html>
5.
Run the HTML file via web browser
Exercices
1.
Modify file TesApplet.java
2.
Next, compile, so the result will shown
Name :
Desy Puspitasari
NIM :
L200134021
Smt :
4
import java.applet.Applet;
import java.awt.Color;
import java.awt.Font;
import java.awt.FontMetrics;
import java.awt.Graphics;
/**
*
* @author DESY
*/
public
class TesApplet extends
Applet {
public void
paint (Graphics grafik){
Font font = new
Font("sanserif",
Font.BOLD, 20);
grafik.setFont(font);
grafik.setColor(Color.blue);
int
xPusat = this.getSize().width/2;
int yPusat = this.getSize().height/2;
String ucapan = "Nama : Desy Puspitasari";
String ucapan1 = "NIM : L200134021";
String ucapan2 = "Smt : 4";
FontMetrics fontMetrics = this.getFontMetrics(font);
int
posisiX = xPusat-(fontMetrics.stringWidth(ucapan)/2);
grafik.drawString(ucapan, posisiX, yPusat);
grafik.drawString(ucapan1, posisiX, yPusat+30);
grafik.drawString(ucapan2, posisiX,
yPusat+60);
}
}
The Result:

2nd Experiment
1.
Make a java file named “TesParameter1.java”,
write down the program code below
/**
*
* @author DESY
*/
public class TesParameter1 extends Applet {
String nama;
public void init (){
nama = getParameter ("nama");
if (nama == null)
nama = "Coy";
nama = "Hai"
+ nama + "!!!";
}
public void paint (Graphics grafik){
grafik.drawString (nama,10,25);
}
}
2.
Compile the following code
3.
Next, make the HTML file to access following
applet, as below
<html>
<head>
<title>Akses Parameter</title>
</head>
<body>
<applet code =
"TesParameter2.class" widht=250 height=200>
<param name = nama
value="Dedi Gunawan">
</applet>
</body>
</html>
4.
Save as the file “aksesparameter.html”
5.
Next, open the browser
Task
1.
Make a java applet file which shown name, nim,
major, semester
2.
Use parameter
3.
Analyze the program code.
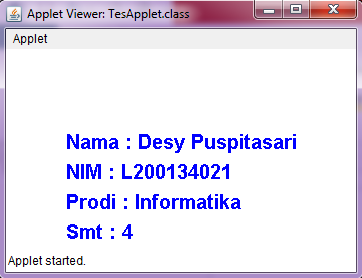
import java.applet.Applet;
import java.awt.Color;
import java.awt.Font;
import java.awt.FontMetrics;
import java.awt.Graphics;
/**
*
* @author DESY
*/
public class TesApplet extends
Applet {
public void paint (Graphics grafik){
Font font = new Font("sanserif", Font.BOLD, 20);
grafik.setFont(font);
grafik.setColor(Color.blue);
int xPusat = this.getSize().width/2;
int yPusat = this.getSize().height/2;
String ucapan = "Nama
: Desy Puspitasari";
String ucapan1 = "NIM
: L200134021";
String ucapan2 = "Prodi
: Informatika";
String ucapan3 = "Smt
: 4";
FontMetrics fontMetrics = this.getFontMetrics(font);
int posisiX = xPusat-(fontMetrics.stringWidth(ucapan)/2);
grafik.drawString(ucapan, posisiX, yPusat);
grafik.drawString(ucapan1, posisiX, yPusat+30);
grafik.drawString(ucapan2, posisiX, yPusat+60);
grafik.drawString(ucapan3, posisiX, yPusat+90);
}
}
The Result:
Langganan:
Komentar (Atom)